자율주행 차량은 어떻게 주변 장면을 이해할까요?How Do Self-Driving Cars Understand the Scene Around Them?
자율주행 차량은 주변의 자동차와 보행자를 구분하는 동시에 도로와 인도 같은 영역도 파악해야 합니다. 이러한 장면 이해에 활용할 수 있는 기술 중 하나가 Panoptic Segmentation입니다.
1. 먼저, Image Segmentation이란?
Segmentation은 ‘분할’이라는 뜻입니다. Image Segmentation은 이미지의 픽셀을 분류하거나 묶어, 물체와 영역의 경계를 나누는 기술입니다.
자동차가 어디 있는지 사각형으로 표시하는 객체 탐지(Object Detection)와 달리, 세그멘테이션은 자동차가 차지하는 픽셀의 모양까지 표현합니다. 이렇게 특정 영역을 표시한 결과를 **마스크(Mask)**라고 부릅니다.
어떤 기준으로 픽셀을 나누는지에 따라 Semantic, Instance, Panoptic Segmentation으로 구분할 수 있습니다.
2. Semantic Segmentation — 이 픽셀은 무엇인가요?
각 픽셀에 클래스, 즉 종류를 부여하는 방식입니다. 사람 픽셀은 사람 색, 자동차 픽셀은 자동차 색, 도로 픽셀은 도로 색으로 표시합니다.
같은 클래스라면 같은 색을 사용합니다. 자동차가 두 대 있어도 모두 ‘자동차’로 표시하며, 개별 자동차를 구분하지는 않습니다. 서로 다른 자동차를 같은 개체라고 판단한다는 뜻은 아닙니다.
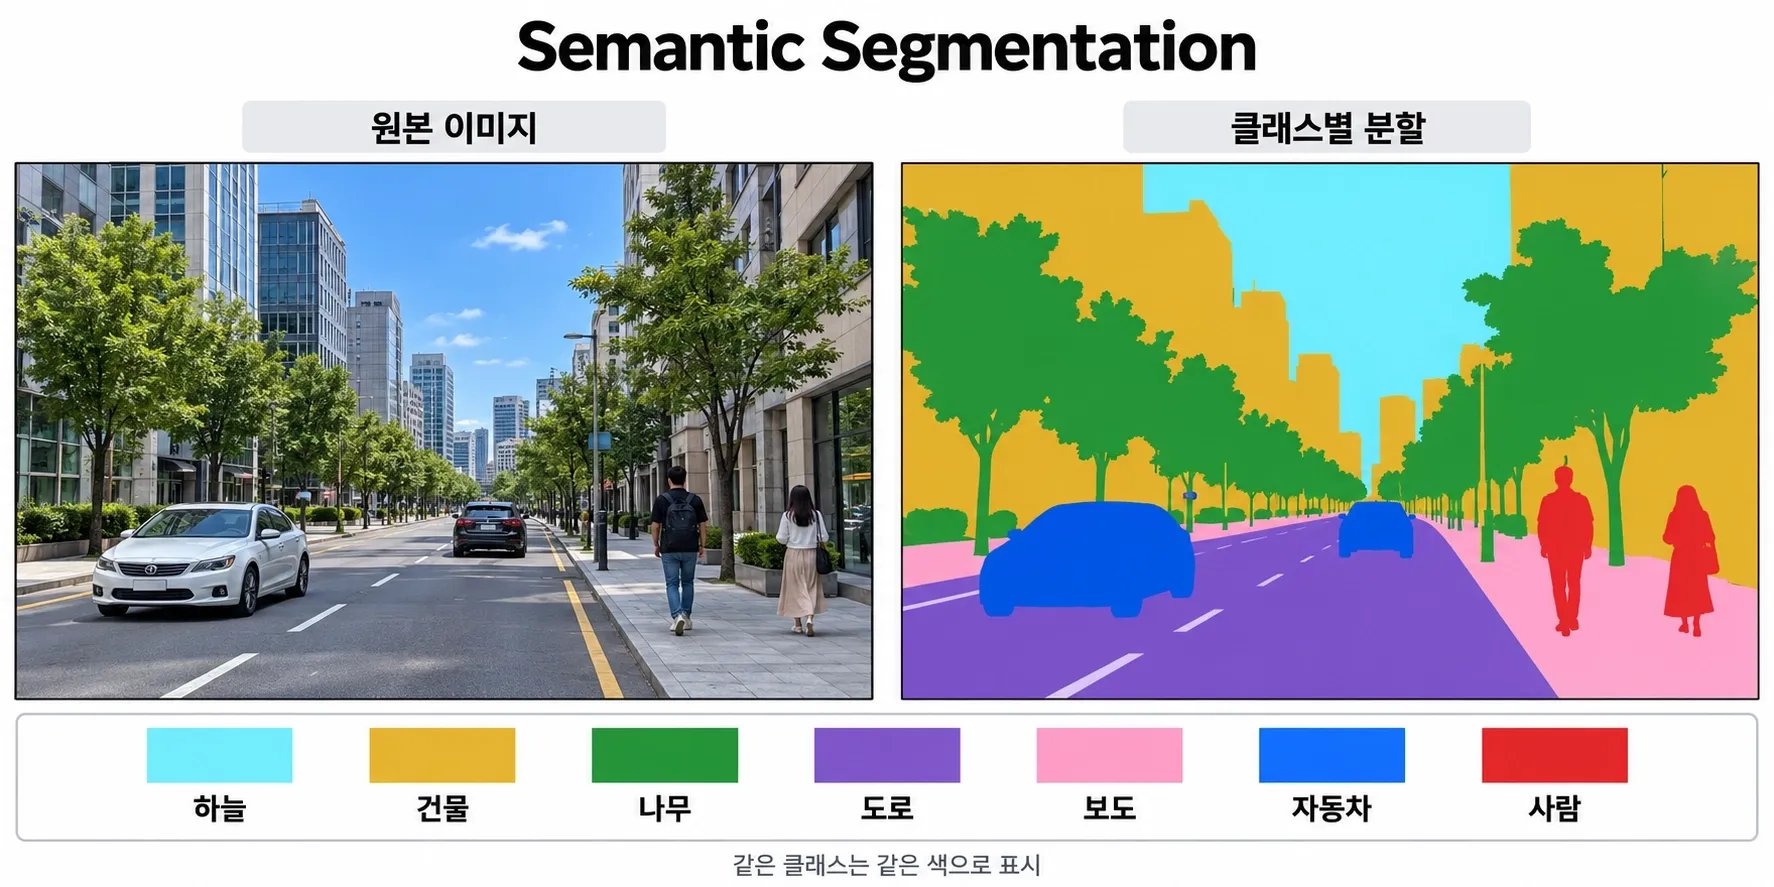
어디에 활용할까요?
장면의 영역 구성이 중요한 문제에 활용합니다. 위성 영상에서 농지·도시·숲의 면적을 분석하거나, 의료 영상에서 종양이 차지하는 영역을 찾는 것이 예입니다.
대표 모델
- FCN: 합성곱 기반으로 이미지의 픽셀별 클래스를 예측하는 대표적인 초기 모델입니다.
- U-Net: 인코더와 디코더의 특징을 연결해 영역과 경계를 복원하며, 의료 영상 분할에 널리 활용됩니다.
- DeepLab 시리즈: 여러 범위의 문맥 정보를 활용해 픽셀별 클래스를 예측합니다.
- SegNet: 인코더의 풀링 위치 정보를 디코더에서 재사용해 분할 결과를 복원합니다.
3. Instance Segmentation — 같은 종류라도 각각 누구인가요?
같은 클래스에 속하는 객체도 개체별로 구분하는 방식입니다.
자동차가 두 대라면 둘 다 ‘자동차’ 클래스이지만 서로 다른 마스크를 받습니다. 사람도 한 명씩 따로 구분합니다.
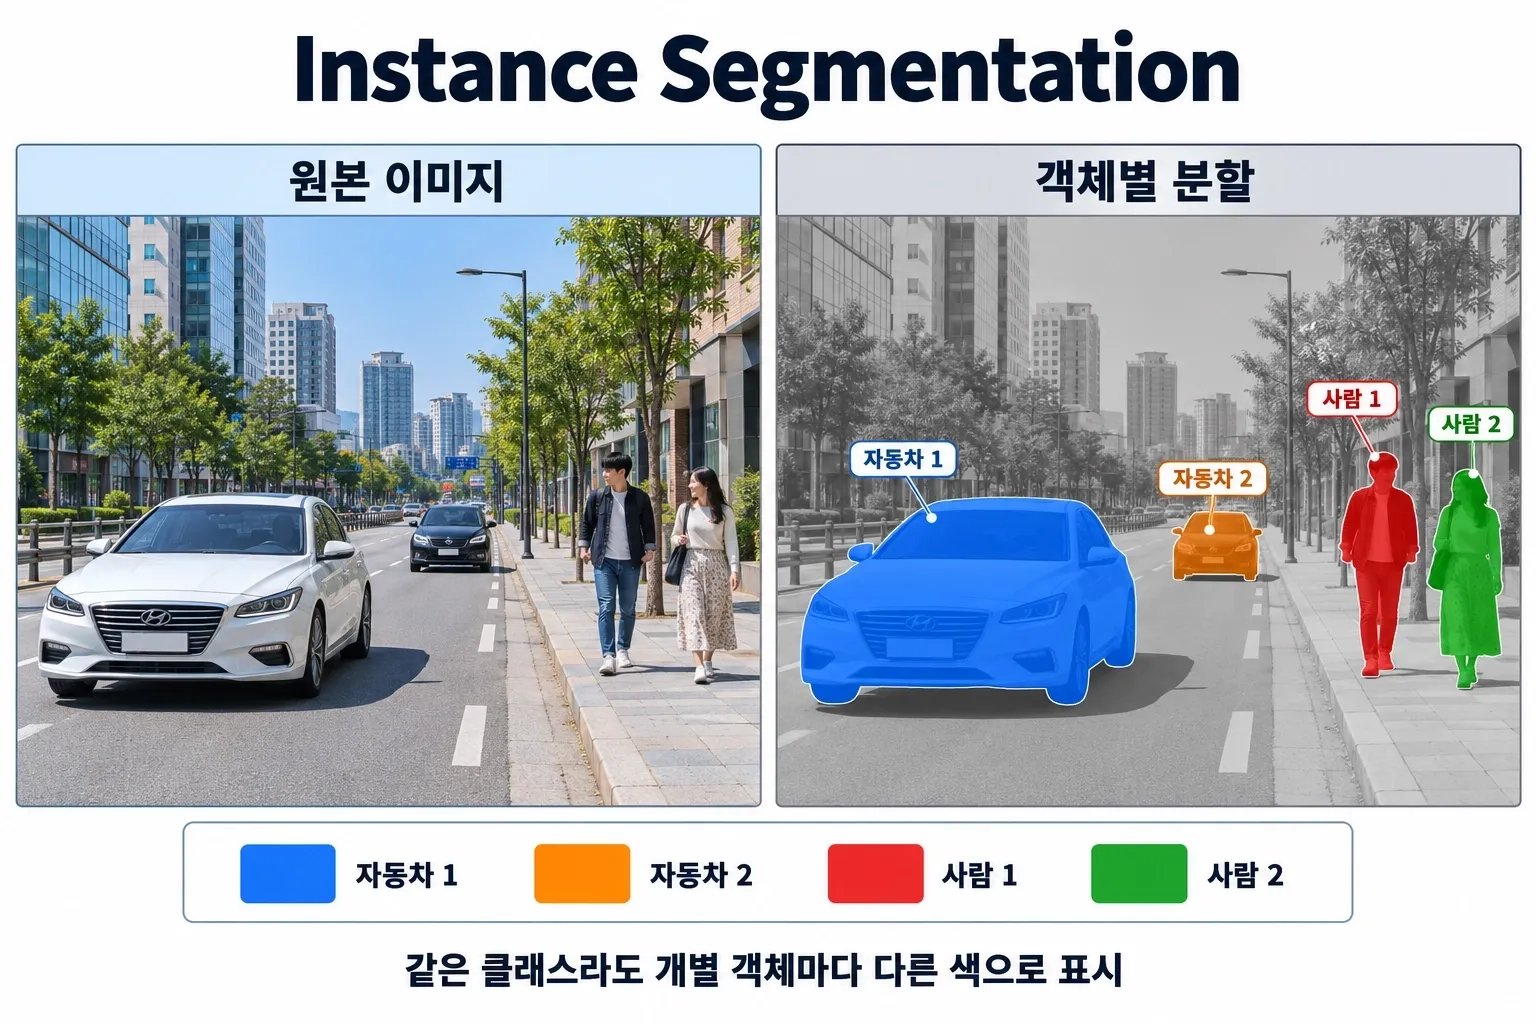
어디에 활용할까요?
매장에 있는 사람 수를 세거나, 세포 이미지에서 개별 세포를 분리하는 문제에 활용합니다. 추적 기술과 결합하면 영상에서 특정 차량이나 사람을 따라가는 데도 사용할 수 있습니다.
한 이미지 안에서 개체를 구분하는 것과 여러 프레임에서 동일한 개체를 추적하는 것은 별개의 문제입니다. 인스턴스 ID가 있다고 해서 다음 프레임에서도 같은 ID가 유지되는 것은 아닙니다.
대표 모델
- Mask R-CNN: 객체 탐지 결과와 함께 개체별 마스크를 예측합니다.
- YOLO의 세그멘테이션 모델: 객체의 클래스와 개체별 마스크를 예측하며, 빠른 추론이 필요한 문제에 활용됩니다.
- YOLACT / YolactEdge: 공통 마스크 패턴과 개체별 계수를 조합해 마스크를 생성합니다.
4. 왜 Panoptic Segmentation이 필요할까요?
도로 장면을 생각해봅시다. 자동차 두 대, 보행자 두 명, 도로, 인도, 하늘이 있습니다.
Semantic Segmentation은 모든 픽셀의 종류를 설명하지만 자동차와 보행자를 개체별로 구분하지 못합니다. Instance Segmentation은 개별 객체를 구분하지만 일반적으로 도로·하늘 같은 배경 영역의 분할은 다루지 않습니다.
장면 전체를 이해하려면 두 가지 정보가 모두 필요합니다.
- 자동차와 보행자는 개체별로 구분해야 합니다.
- 도로·인도·하늘은 영역의 클래스를 구분해야 합니다.
Panoptic Segmentation은 픽셀별 클래스 분류와 개체별 분할을 하나의 과제로 통합한 개념입니다.
5. 세 방식은 무엇이 다를까요?
| 구분 | Semantic | Instance | Panoptic |
|---|---|---|---|
| 핵심 질문 | 이 픽셀은 무엇인가? | 이 객체는 어떤 개체인가? | 이 픽셀은 무엇이고, 어떤 개체에 속하는가? |
| 같은 클래스의 개체 구분 | 하지 않음 | 구분함 | 구분함 |
| 도로·하늘 같은 영역 분할 | 포함 | 일반적으로 제외 | 포함 |
| 출력 | 픽셀별 클래스 | 개체별 클래스와 마스크 | 픽셀별 클래스와 개체 구분 정보 |
자동차 두 대가 있는 장면이라면 Semantic은 두 자동차를 같은 클래스로 표시합니다. Instance는 자동차 두 대를 서로 다른 마스크로 표시합니다. Panoptic은 자동차를 각각 구분하면서 도로와 하늘도 함께 표시합니다.
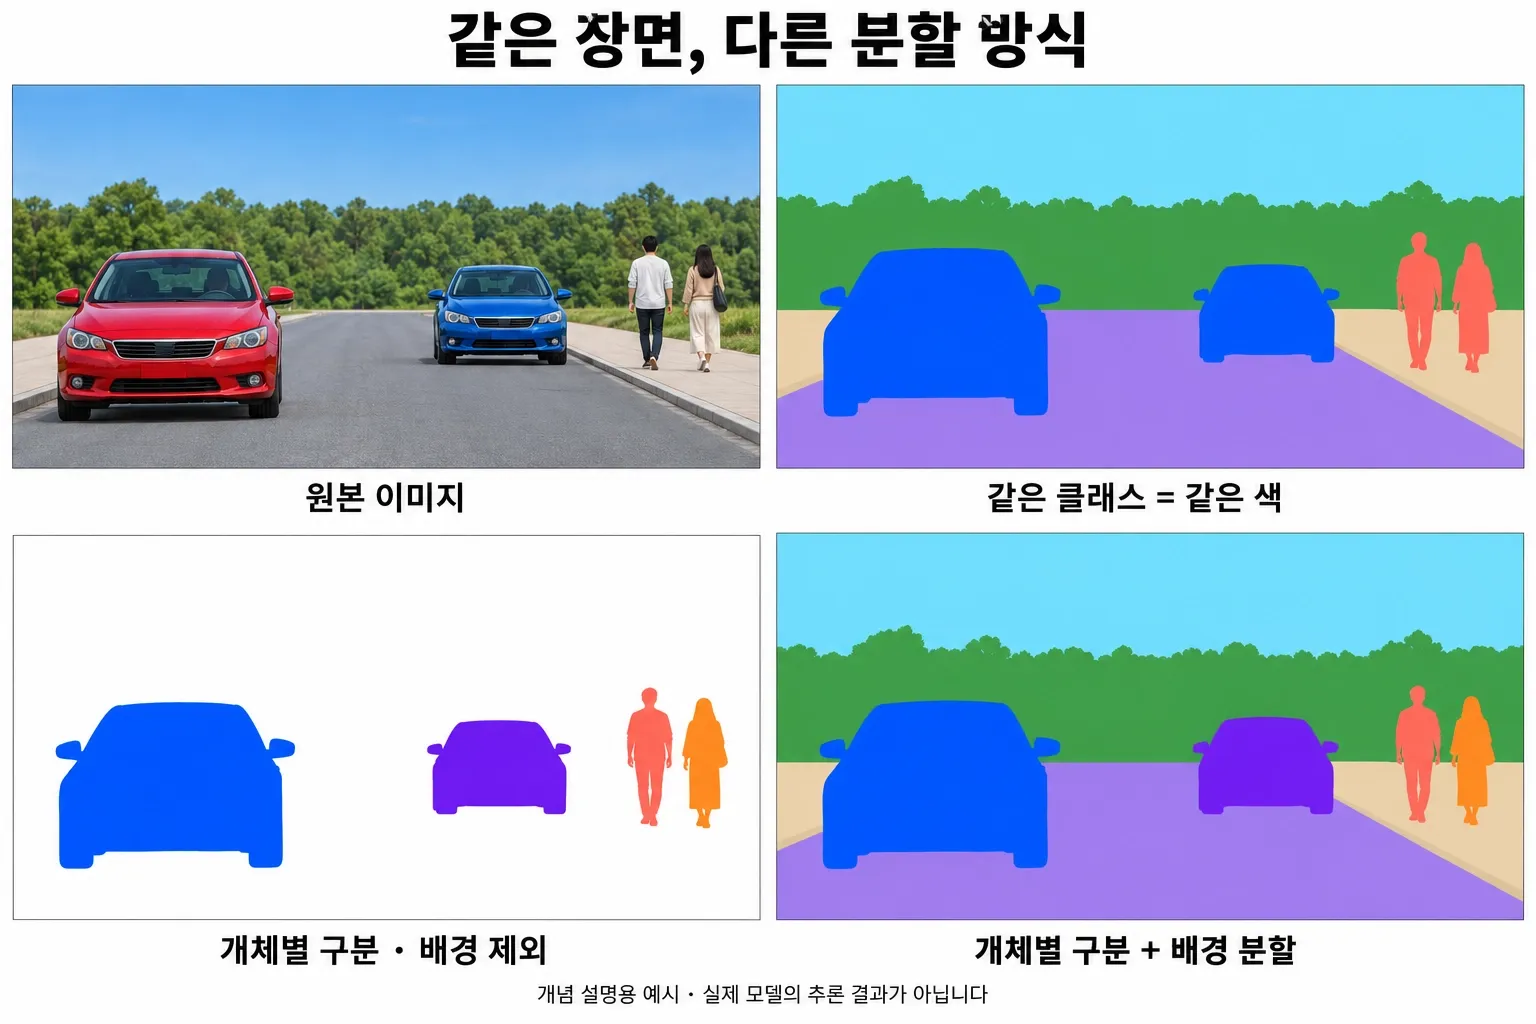
6. 어떻게 해결할까요?
6.1. Things와 Stuff를 구분합니다
Panoptic Segmentation에서는 클래스를 다음 두 부류로 나눕니다.
- Things: 사람·자동차처럼 개별 객체로 구분하는 클래스입니다.
- Stuff: 도로·하늘·잔디처럼 개체보다 영역으로 다루는 클래스입니다.
‘셀 수 있는 것’과 ‘셀 수 없는 것’으로 이해하면 쉽지만, 실제 구분은 사용하는 데이터셋의 클래스 정의를 따릅니다.
6.2. 클래스와 개체 정보를 함께 표현합니다
예를 들어 다음과 같이 결과를 표현할 수 있습니다.
| 영역 | 클래스 | 개체 구분 |
|---|---|---|
| 첫 번째 자동차 | 자동차 | 자동차 A |
| 두 번째 자동차 | 자동차 | 자동차 B |
| 첫 번째 보행자 | 사람 | 사람 A |
| 두 번째 보행자 | 사람 | 사람 B |
| 도로 | 도로 | 개체 구분 대상 아님 |
| 하늘 | 하늘 | 개체 구분 대상 아님 |
Things는 같은 클래스 안에서도 개체를 구분하고, Stuff는 클래스별 영역으로 표현합니다. 이상적인 파놉틱 결과에서는 각 픽셀에 하나의 클래스와 영역을 부여하므로, 최종 영역끼리 겹치지 않습니다. 실제 추론에서는 신뢰도 기준 등으로 미할당 픽셀이 남을 수 있습니다.
6.3. 결과를 만드는 방식은 모델마다 다릅니다
개념적으로 Semantic과 Instance의 목표를 결합하지만, 반드시 두 모델을 따로 실행해 합치는 것은 아닙니다.
- 결과를 결합하는 방식: 개체 마스크와 배경 분할을 예측한 뒤 겹치는 영역 등을 정리합니다.
- 중심점으로 묶는 방식: 픽셀의 클래스와 객체 중심점 방향을 예측해 같은 개체의 픽셀을 묶습니다.
- 클래스와 마스크를 함께 예측하는 방식: 여러 영역의 클래스와 마스크를 예측하고 후처리로 최종 분할 맵을 만듭니다.
대표 모델
- Panoptic FPN: 특징을 공유하며 개체 분할과 배경 분할을 함께 예측하고 통합합니다.
- Panoptic-DeepLab: 클래스와 객체 중심점·오프셋을 예측해 픽셀을 개체별로 묶습니다.
- Mask2Former: 예측 마스크 영역에 집중하는 어텐션을 사용하며 세 가지 분할 과제를 지원합니다.
- OneFormer: 작업 종류를 지정해 하나의 모델로 Semantic·Instance·Panoptic 분할을 수행합니다.
7. 대표 모델이 다르면, 모델이 과제를 정하는 걸까요?
앞에서 과제마다 대표 모델을 나눠 소개했지만, 세 과제는 출력 형태로 정의되며 특정 아키텍처에 묶여 있지 않습니다. Semantic의 대표 모델로 소개한 U-Net도 무엇을 예측하도록 학습하느냐에 따라 Instance Segmentation에 사용할 수 있습니다.
7.1. 왜 그대로는 어려울까요?
Semantic은 ‘자동차’, ‘도로’처럼 클래스가 정해져 있어 출력 채널 하나에 클래스 하나를 대응시킬 수 있습니다. 반면 개체 ID에는 고정된 의미가 없습니다.
- 자동차 A와 자동차 B의 이름을 서로 바꿔도 같은 정답입니다.
- 이미지마다 개체 수가 다릅니다.
그래서 정해진 수의 채널로 픽셀별 클래스를 예측하는 구조에 개체 ID를 그대로 정답으로 줄 수는 없습니다. 이 문제를 푸는 방식에 따라 크게 두 갈래로 나뉩니다.
- Top-down (탐지 후 분할): 먼저 객체를 찾고, 찾은 객체마다 마스크를 예측합니다. 개체 수 문제를 탐지 단계가 해결합니다. Mask R-CNN이 대표적입니다.
- Bottom-up (픽셀 예측 후 묶기): 개체 ID 대신 번호와 무관한 값을 픽셀마다 예측하고, 후처리로 같은 개체의 픽셀을 묶습니다. U-Net 같은 인코더-디코더 구조를 그대로 활용할 수 있습니다.
7.2. U-Net으로 개체를 구분하는 방법
| 픽셀마다 예측하는 값 | 개체로 묶는 방법 | 예시 |
|---|---|---|
| 전경 / 경계 / 배경 | 경계로 끊긴 영역을 각각 분리 | U-Net 원 논문 (붙어 있는 세포 경계에 가중치) |
| 객체 중심까지의 거리 | Watershed | 세포·핵 분할 |
| 중심에서 경계까지의 방사형 거리 | 다각형으로 복원 | StarDist |
| 중심을 향하는 흐름 벡터 | 흐름을 따라 모이는 픽셀끼리 묶기 | Cellpose |
| 픽셀별 임베딩 벡터 | 클러스터링 | Discriminative Loss |
| 클래스 + 중심점 + 오프셋 | 가장 가까운 중심점에 할당 | Panoptic-DeepLab |
구조는 거의 그대로 두고, 출력과 손실 함수만 바꾼 것입니다. 6.3에서 소개한 ‘중심점으로 묶는 방식’도 이 흐름에 속합니다.
7.3. 그래도 방식마다 잘 맞는 문제가 있습니다
- Bottom-up은 한 픽셀에 하나의 개체만 부여하므로, 서로 겹친 객체를 각각 온전한 마스크로 표현하기 어렵습니다. Top-down은 개체마다 마스크를 따로 예측하므로 마스크끼리 겹칠 수 있습니다.
- 크기 차이가 큰 객체가 섞인 장면에서는 탐지 기반 방식이 안정적인 경우가 많습니다.
- 비슷한 크기의 객체가 빽빽하게 모인 세포 이미지에서는 Bottom-up 방식이 널리 쓰입니다.
- Bottom-up은 후처리 기준(경계 임계값, 클러스터링 기준 등)에 따라 결과가 달라질 수 있습니다.
7.4. 하나의 구조로 세 과제를 다루기
Mask2Former는 정해진 개수의 마스크와 각 마스크의 클래스를 예측하고, 학습할 때 예측과 정답을 일대일로 짝지어(Hungarian Matching) 비교합니다. 순서와 관계없이 가장 잘 맞는 짝을 찾으므로 개체 ID의 순서 문제가 사라집니다. 그래서 같은 구조를 Semantic·Instance·Panoptic 데이터로 각각 학습해 세 과제에 모두 사용할 수 있습니다.
대표 모델 목록은 각 과제에서 먼저 좋은 성능을 보인 모델을 정리한 것이며, 과제와 모델이 일대일로 대응하는 것은 아닙니다.
8. 코드에서는 어떻게 활용할까요?
사전 학습된 Mask2Former로 이미지 한 장을 분할해봅시다. 다음 코드는 Hugging Face 공식 문서와 COCO Panoptic 체크포인트의 API를 참고한 예제입니다.
이 체크포인트는 COCO의 클래스 체계를 사용합니다. 자율주행 전용 도로·인도 분할이 목적이라면 해당 클래스가 포함된 데이터셋으로 학습한 체크포인트를 선택해야 합니다.
8.1. 준비
pip install torch torchvision transformers pillow matplotlib numpy분할할 이미지를 scene.jpg로 준비합니다. 최초 실행에는 모델 파일을 내려받기 위한 인터넷 연결이 필요합니다.
8.2. 이미지 입력 → 모델 추론 → 후처리
import numpy as np
import torch
import matplotlib.pyplot as plt
from PIL import Image
from transformers import AutoImageProcessor, Mask2FormerForUniversalSegmentation

checkpoint = "facebook/mask2former-swin-small-coco-panoptic"
processor = AutoImageProcessor.from_pretrained(checkpoint)
model = Mask2FormerForUniversalSegmentation.from_pretrained(checkpoint)
model.eval()

image = Image.open("scene.png").convert("RGB")
inputs = processor(images=image, return_tensors="pt")

with torch.inference_mode():
    outputs = model(**inputs)

result = processor.post_process_panoptic_segmentation(
    outputs,
    target_sizes=[(image.height, image.width)],
    label_ids_to_fuse=set(),
)[0]

segmentation = result["segmentation"].cpu().numpy()
segments_info = result["segments_info"]

for segment in segments_info:
    label = model.config.id2label[segment["label_id"]]
    pixel_count = int((segmentation == segment["id"]).sum())
    print(
        f"영역 ID={segment['id']}, 클래스={label}, "
        f"점수={segment['score']:.3f}, 픽셀 수={pixel_count}"
    )
#output
[transformers] Mask2FormerForUniversalSegmentation LOAD REPORT from: facebook/mask2former-swin-small-coco-panoptic
Key | Status |
-------------------------------------------------------------------------------------------------------------------------+------------+-
model.pixel_level_module.encoder.swin.encoder.layers.{0, 1, 2, 3}.blocks.{0...17}.attention.self.relative_position_index | UNEXPECTED |
model.pixel_level_module.encoder.swin.layernorm.bias | MISSING |
model.pixel_level_module.encoder.swin.layernorm.weight | MISSING |
Notes:
- UNEXPECTED: can be ignored when loading from different task/architecture; not ok if you expect identical arch.
- MISSING: those params were newly initialized because missing from the checkpoint. Consider training on your downstream task.
영역 ID=1, 클래스=car, 점수=0.998, 픽셀 수=140758
영역 ID=2, 클래스=wall-stone, 점수=0.910, 픽셀 수=17587
영역 ID=3, 클래스=person, 점수=0.999, 픽셀 수=12782
영역 ID=4, 클래스=pavement-merged, 점수=0.994, 픽셀 수=164265
영역 ID=5, 클래스=grass-merged, 점수=0.861, 픽셀 수=4038
영역 ID=6, 클래스=mountain-merged, 점수=0.876, 픽셀 수=4870
영역 ID=7, 클래스=person, 점수=0.999, 픽셀 수=12482
영역 ID=8, 클래스=car, 점수=0.999, 픽셀 수=20824
영역 ID=9, 클래스=sky-other-merged, 점수=1.000, 픽셀 수=190229
영역 ID=10, 클래스=tree-merged, 점수=0.998, 픽셀 수=591433
영역 ID=11, 클래스=road, 점수=0.997, 픽셀 수=413505label_ids_to_fuse는 같은 Stuff 클래스의 마스크들을 합칠 때 사용합니다.
8.3. 영역별로 색을 칠해봅시다
# facebook/mask2former-swin-small-coco-panoptic 기준
# 클래스 ID 0~79: Things(개별 객체)
thing_ids = set(range(80))

object_colors = np.array([
    [255, 40, 40],    # 빨강
    [0, 80, 255],    # 파랑
    [255, 150, 0],   # 주황
    [210, 0, 255],   # 보라
    [0, 210, 110],   # 초록
    [255, 0, 150],   # 분홍
], dtype=np.uint8)

background_colors = np.array([
    [180, 205, 220],
    [195, 215, 185],
    [220, 205, 180],
    [205, 195, 220],
], dtype=np.uint8)

original = np.array(image)
overlay = original.copy()
object_index = 0

for segment in segments_info:
    mask = segmentation == segment["id"]
    label_id = segment["label_id"]

    if label_id in thing_ids:
        # 객체마다 다른 선명한 색
        color = object_colors[object_index % len(object_colors)]
        object_index += 1
        alpha = 0.75
    else:
        background_colors = np.array([
            [0, 220, 255],    # 하늘색
            [160, 255, 40],   # 연두색
            [255, 210, 0],    # 노란색
            [180, 100, 255],  # 보라색
        ], dtype=np.uint8)

        color = background_colors[
            (label_id - 80) % len(background_colors)
        ]
        alpha = 0.65

    overlay[mask] = (
        (1 - alpha) * original[mask] + alpha * color
    ).astype(np.uint8)

fig, axes = plt.subplots(1, 2, figsize=(12, 6))
axes[0].imshow(image)
axes[0].set_title("Original")
axes[1].imshow(overlay)
axes[1].set_title("Panoptic segmentation")

for axis in axes:
    axis.axis("off")

plt.tight_layout()
plt.savefig("panoptic_result.png", dpi=150)
plt.show()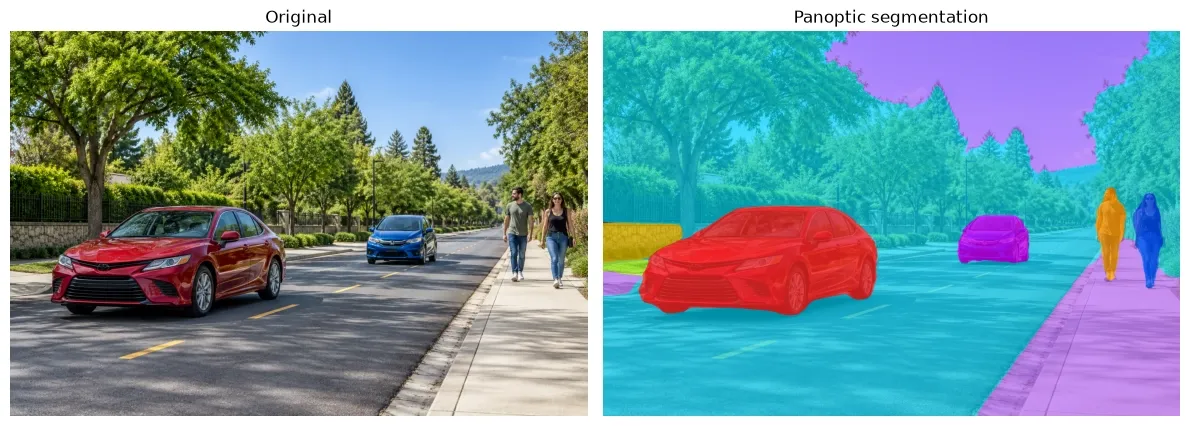
이 결과에서 특정 클래스의 마스크를 추출하거나, 예측된 자동차 영역 수를 세거나, 영역이 차지하는 픽셀 수를 계산할 수 있습니다. 픽셀 면적을 실제 거리·면적으로 바꾸려면 카메라 보정과 깊이 같은 추가 정보가 필요합니다.
참고 자료
- Panoptic Segmentation 원 논문
- Mask2Former 원 논문
- Hugging Face Mask2Former 공식 문서
- 예제에서 사용한 모델 체크포인트
A self-driving car has to tell the cars and pedestrians around it apart while also making sense of areas such as the road and the sidewalk. One technique that can be used for this kind of scene understanding is Panoptic Segmentation.
1. First, what is image segmentation?
Segmentation means “dividing”. Image segmentation is the technique of classifying or grouping the pixels of an image to draw the boundaries of objects and regions.
Unlike object detection, which marks where a car is with a rectangle, segmentation also captures the shape of the pixels the car occupies. The result that marks a particular region is called a mask.
Depending on how the pixels are divided, it splits into semantic, instance and panoptic segmentation.
2. Semantic segmentation — what is this pixel?
It assigns a class, that is, a kind, to each pixel. Person pixels get the person color, car pixels the car color, road pixels the road color.
The same class uses the same color. Even if there are two cars, both are marked as “car” and individual cars are not distinguished. This does not mean it thinks the two cars are the same object.
Where is it used?
For problems where the layout of regions in a scene matters. Examples include analyzing the area of farmland, cities and forests in satellite imagery, or finding the region a tumor occupies in medical images.
Representative models
- FCN: a representative early model that predicts a class for each pixel using convolutions.
- U-Net: connects encoder and decoder features to restore regions and boundaries, and is widely used for medical image segmentation.
- DeepLab series: predicts per-pixel classes using context information at multiple ranges.
- SegNet: reuses the encoder’s pooling indices in the decoder to restore the segmentation.
3. Instance segmentation — even within the same kind, which one is which?
It distinguishes individual objects even when they belong to the same class.
If there are two cars, both are in the “car” class but each gets its own mask. People are distinguished one by one as well.
Where is it used?
For counting the people in a store, or separating individual cells in cell images. Combined with tracking, it can also be used to follow a specific car or person through a video.
Distinguishing objects within one image and tracking the same object across frames are separate problems. Having an instance ID does not mean the same ID is kept in the next frame.
Representative models
- Mask R-CNN: predicts a mask for each object along with the detection result.
- YOLO segmentation models: predict each object’s class and mask, and are used where fast inference is needed.
- YOLACT / YolactEdge: build masks by combining shared mask patterns with per-object coefficients.
4. Why do we need panoptic segmentation?
Picture a road scene: two cars, two pedestrians, the road, the sidewalk and the sky.
Semantic segmentation explains the kind of every pixel but cannot tell the cars and pedestrians apart individually. Instance segmentation distinguishes individual objects but usually does not segment background regions like the road or the sky.
To understand the whole scene, you need both kinds of information.
- Cars and pedestrians must be distinguished one by one.
- The road, sidewalk and sky must be distinguished by region class.
Panoptic segmentation is the concept that unifies per-pixel classification and per-object segmentation into a single task.
5. How do the three differ?
| Semantic | Instance | Panoptic | |
|---|---|---|---|
| Core question | What is this pixel? | Which object is this? | What is this pixel, and which object does it belong to? |
| Distinguishes objects of the same class | No | Yes | Yes |
| Segments regions like road and sky | Included | Usually excluded | Included |
| Output | Class per pixel | Class and mask per object | Class per pixel plus object identity |
In a scene with two cars, semantic marks both cars as the same class. Instance marks the two cars with different masks. Panoptic distinguishes each car while also marking the road and the sky.
6. How is it solved?
6.1. Separating things and stuff
Panoptic segmentation divides classes into two groups.
- Things: classes split into individual objects, like people and cars.
- Stuff: classes treated as regions rather than objects, like road, sky and grass.
It is easy to think of them as “countable” and “uncountable”, but in practice the split follows the class definitions of the dataset you use.
6.2. Representing class and object information together
For example, the result can be represented like this.
| Region | Class | Object identity |
|---|---|---|
| First car | Car | Car A |
| Second car | Car | Car B |
| First pedestrian | Person | Person A |
| Second pedestrian | Person | Person B |
| Road | Road | Not split into objects |
| Sky | Sky | Not split into objects |
Things are distinguished by object even within the same class, while stuff is represented as one region per class. An ideal panoptic result gives each pixel exactly one class and region, so the final regions never overlap. In real inference, some pixels may be left unassigned because of confidence thresholds and the like.
6.3. How the result is produced differs by model
Conceptually it combines the goals of semantic and instance segmentation, but that does not necessarily mean running two separate models and merging their outputs.
- Merging results: predict object masks and the background segmentation, then resolve overlapping regions and so on.
- Grouping by center points: predict each pixel’s class and the direction to its object’s center, then group pixels belonging to the same object.
- Predicting classes and masks together: predict the classes and masks of many regions and build the final segmentation map in post-processing.
Representative models
- Panoptic FPN: shares features to predict instance and background segmentation together, then merges them.
- Panoptic-DeepLab: predicts classes plus object centers and offsets to group pixels by object.
- Mask2Former: uses attention focused on predicted mask regions and supports all three segmentation tasks.
- OneFormer: performs semantic, instance and panoptic segmentation with a single model by specifying the task type.
7. If the representative models differ, does the model decide the task?
The representative models were introduced per task above, but the three tasks are defined by their output format and are not tied to a particular architecture. U-Net, introduced as a representative semantic model, can also be used for instance segmentation depending on what it is trained to predict.
7.1. Why is it hard as is?
In semantic segmentation the classes are fixed, like “car” and “road”, so one output channel can correspond to one class. Object IDs, on the other hand, have no fixed meaning.
- Swapping the names of car A and car B gives the same correct answer.
- The number of objects differs from image to image.
So you cannot give object IDs directly as targets to an architecture that predicts per-pixel classes with a fixed number of channels. Approaches split into two broad branches depending on how they solve this.
- Top-down (detect, then segment): first find the objects, then predict a mask for each one. The detection stage handles the varying number of objects. Mask R-CNN is the typical example.
- Bottom-up (predict pixels, then group): instead of object IDs, predict a value per pixel that does not depend on numbering, then group pixels of the same object in post-processing. Encoder-decoder architectures like U-Net can be used as they are.
7.2. Ways to distinguish objects with U-Net
| Value predicted per pixel | How pixels are grouped into objects | Example |
|---|---|---|
| Foreground / boundary / background | Separate each region cut off by boundaries | The original U-Net paper (weights on boundaries between touching cells) |
| Distance to the object center | Watershed | Cell and nucleus segmentation |
| Radial distances from the center to the boundary | Reconstruct as a polygon | StarDist |
| Flow vectors pointing to the center | Group pixels that converge along the flow | Cellpose |
| Per-pixel embedding vectors | Clustering | Discriminative Loss |
| Class + center + offset | Assign to the nearest center | Panoptic-DeepLab |
The architecture stays almost the same; only the outputs and the loss function change. The “grouping by center points” approach from 6.3 belongs to this line as well.
7.3. Still, each approach suits certain problems
- Bottom-up assigns only one object to each pixel, so it struggles to represent overlapping objects with complete masks. Top-down predicts a separate mask for each object, so masks can overlap.
- In scenes that mix objects of very different sizes, detection-based approaches are often more stable.
- In cell images packed with objects of similar size, bottom-up approaches are widely used.
- Bottom-up results can change depending on post-processing settings (boundary thresholds, clustering criteria, etc.).
7.4. Handling all three tasks with one architecture
Mask2Former predicts a fixed number of masks and a class for each, and during training compares predictions and ground truth by pairing them one-to-one (Hungarian matching). Because it finds the best-matching pairs regardless of order, the problem of object ID ordering disappears. So the same architecture can be trained on semantic, instance or panoptic data and used for all three tasks.
The lists of representative models show which models first performed well on each task; tasks and models do not map one-to-one.
8. How is it used in code?
Let’s segment a single image with a pretrained Mask2Former. The code below is an example based on the Hugging Face documentation and the API of a COCO panoptic checkpoint.
This checkpoint uses COCO’s class scheme. If your goal is road and sidewalk segmentation specifically for self-driving, choose a checkpoint trained on a dataset that includes those classes.
8.1. Setup
pip install torch torchvision transformers pillow matplotlib numpyPrepare the image to segment as scene.jpg. The first run needs an internet connection to download the model files.
8.2. Image input → model inference → post-processing
import numpy as np
import torch
import matplotlib.pyplot as plt
from PIL import Image
from transformers import AutoImageProcessor, Mask2FormerForUniversalSegmentation

checkpoint = "facebook/mask2former-swin-small-coco-panoptic"
processor = AutoImageProcessor.from_pretrained(checkpoint)
model = Mask2FormerForUniversalSegmentation.from_pretrained(checkpoint)
model.eval()

image = Image.open("scene.png").convert("RGB")
inputs = processor(images=image, return_tensors="pt")

with torch.inference_mode():
    outputs = model(**inputs)

result = processor.post_process_panoptic_segmentation(
    outputs,
    target_sizes=[(image.height, image.width)],
    label_ids_to_fuse=set(),
)[0]

segmentation = result["segmentation"].cpu().numpy()
segments_info = result["segments_info"]

for segment in segments_info:
    label = model.config.id2label[segment["label_id"]]
    pixel_count = int((segmentation == segment["id"]).sum())
    print(
        f"영역 ID={segment['id']}, 클래스={label}, "
        f"점수={segment['score']:.3f}, 픽셀 수={pixel_count}"
    )
#output
[transformers] Mask2FormerForUniversalSegmentation LOAD REPORT from: facebook/mask2former-swin-small-coco-panoptic
Key | Status |
-------------------------------------------------------------------------------------------------------------------------+------------+-
model.pixel_level_module.encoder.swin.encoder.layers.{0, 1, 2, 3}.blocks.{0...17}.attention.self.relative_position_index | UNEXPECTED |
model.pixel_level_module.encoder.swin.layernorm.bias | MISSING |
model.pixel_level_module.encoder.swin.layernorm.weight | MISSING |
Notes:
- UNEXPECTED: can be ignored when loading from different task/architecture; not ok if you expect identical arch.
- MISSING: those params were newly initialized because missing from the checkpoint. Consider training on your downstream task.
영역 ID=1, 클래스=car, 점수=0.998, 픽셀 수=140758
영역 ID=2, 클래스=wall-stone, 점수=0.910, 픽셀 수=17587
영역 ID=3, 클래스=person, 점수=0.999, 픽셀 수=12782
영역 ID=4, 클래스=pavement-merged, 점수=0.994, 픽셀 수=164265
영역 ID=5, 클래스=grass-merged, 점수=0.861, 픽셀 수=4038
영역 ID=6, 클래스=mountain-merged, 점수=0.876, 픽셀 수=4870
영역 ID=7, 클래스=person, 점수=0.999, 픽셀 수=12482
영역 ID=8, 클래스=car, 점수=0.999, 픽셀 수=20824
영역 ID=9, 클래스=sky-other-merged, 점수=1.000, 픽셀 수=190229
영역 ID=10, 클래스=tree-merged, 점수=0.998, 픽셀 수=591433
영역 ID=11, 클래스=road, 점수=0.997, 픽셀 수=413505label_ids_to_fuse is used to merge masks of the same stuff class.
8.3. Coloring each region
# facebook/mask2former-swin-small-coco-panoptic 기준
# 클래스 ID 0~79: Things(개별 객체)
thing_ids = set(range(80))

object_colors = np.array([
    [255, 40, 40],    # 빨강
    [0, 80, 255],    # 파랑
    [255, 150, 0],   # 주황
    [210, 0, 255],   # 보라
    [0, 210, 110],   # 초록
    [255, 0, 150],   # 분홍
], dtype=np.uint8)

background_colors = np.array([
    [180, 205, 220],
    [195, 215, 185],
    [220, 205, 180],
    [205, 195, 220],
], dtype=np.uint8)

original = np.array(image)
overlay = original.copy()
object_index = 0

for segment in segments_info:
    mask = segmentation == segment["id"]
    label_id = segment["label_id"]

    if label_id in thing_ids:
        # 객체마다 다른 선명한 색
        color = object_colors[object_index % len(object_colors)]
        object_index += 1
        alpha = 0.75
    else:
        background_colors = np.array([
            [0, 220, 255],    # 하늘색
            [160, 255, 40],   # 연두색
            [255, 210, 0],    # 노란색
            [180, 100, 255],  # 보라색
        ], dtype=np.uint8)

        color = background_colors[
            (label_id - 80) % len(background_colors)
        ]
        alpha = 0.65

    overlay[mask] = (
        (1 - alpha) * original[mask] + alpha * color
    ).astype(np.uint8)

fig, axes = plt.subplots(1, 2, figsize=(12, 6))
axes[0].imshow(image)
axes[0].set_title("Original")
axes[1].imshow(overlay)
axes[1].set_title("Panoptic segmentation")

for axis in axes:
    axis.axis("off")

plt.tight_layout()
plt.savefig("panoptic_result.png", dpi=150)
plt.show()
From this result you can extract the mask of a specific class, count the predicted car regions, or compute how many pixels a region occupies. Converting pixel areas into real distances or areas requires extra information such as camera calibration and depth.
References
- The original Panoptic Segmentation paper
- The original Mask2Former paper
- Hugging Face Mask2Former documentation
- The model checkpoint used in the example